


Saturday, April 3, 2010
Obeying Col. Corbanes Orders: An Army Painter Tutorial... Part Four: Finishing Touches
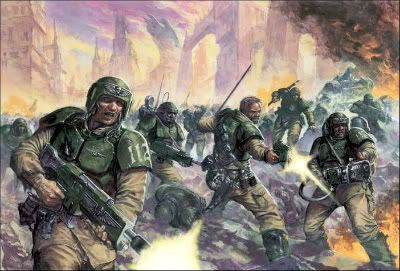
Posted by The 25mm Warrior at 10:20 PMBefore we get into it here they are finished and complete!
First off I am very, very pleased with how these guys turned out. These are quite possibly the best minis I've ever painted!
To finish off the Guardsmen above all that was left to do was anti-shine, base and decal the mini. When using anti-shine to dull up the super shiny Army Painter dip only a few rules need to be followed...
First: Less is more.
Never put a bunch of anti-shine on the mini. YOU WILL CLOUD IT UP!!! Trust me... I know. A few short controlled bursts is all that's needed. If after the anti-shine drys and you notice there are spots where some significant shine is left over then apply some more but only a little each time. I'm serious about this! This stage is critical! If done wrong your mini WILL look like crap. Now in order to make sure we don't have crappy minis were lead right into the second rule...
Second: The Hand Waving method
Ok now I want you to do something. Raise the hand you use spray with and act like your waving goodbye. Are you waving goodbye yet? Good. Now imagine your holding your spray can in your hand as your waving. Now do that exact same motion when applying the anti-shine. If done in conjunction with short controlled bursts you'll be safeguarding yourself from applying too much of it and screwing up your expensive miniature.
Once the mini is good and dry it's time to base.
This is super easy and follows the same easy to paint and get on the table method we've been doing this whole tutorial. Paint the base Graveyard Earth. Then take good 'ol white glue and coat the top of the base. Then dip it into some modeling sand. Once that dries put some more white glue on top and pat static grass on top of the glue. That's it. Some people like to get all crazy painting bases, adding crap to it and such. That's cool and all but we're aiming for speed here. Besides I've never understood the whole painting bases thing. The modeling sand and static grass already has natural highlights and shades to it, saving you the time and trouble.
As far as decals go I used the whole Micro Set, Micro Sol thing that Miks Minis turned me on to. This was a first for me since I've never used the stuff. It's alright. Better than just using water. I was a bit disappointed that the shine on the decal wasn't dulled by the solution. The decals look far better than the job I did on my Blood Angels . I guess I was expecting it to look like it was apart of the paint job itself. Maybe the dip is screwing with it.
So there you have it. A big thanks to Col. Corbane for the comment that inspired me to do this. I hope that when it come to the Imperial Guard I obeyed his orders to do it quick and fast while doing it well!
Drop me some comments to let me know what ya think or have any tips to add to this yourself.
Thanks for reading mates!


5 comments:
thanks for the tips and tutorial.
i'm also in the process of base coating for dipping in army painter and was wondering when to do the decals and base.
maybe it's better to apply the decal before the anti-shine? perhaps even before the dip so it can be shaded as well?
interesting that you did the base last. never thought of that. i automatically assumed the base should be shaded with dip too. might follow you and do it last.
I would definitely apply the decals before applying the dullcote. I have done bases before and after dipping, both work - just give different results. I think I prefer after as it makes the bases look different than the mini.
Definately apply the decals before the dullcoat, this will also help them stay on. If you want to help them blend into your model even more try painting over the decal once its applied and dried. You dont need to completely cover it, just paint the edges into the surrounding shoulder pad and perhaps hit up the centre of the white parts with skull white. It goes without saying be careful not to paint the thing out or to pull it off with your wet paintbrush! (Ive totally done that and its frustrating!!!) They look really great, id never have put them down as dipped if id seen the picks without the description. Great job!
Good work there, they look fantastic! I especially like the way the army painter produces sweet shading on the uniforms.
The Commissar looks excellent too!
Hey,
Just wondering how close the Army Painter colour you've got there (Skeleton Bone, was it?) is to GW's Kommando Khaki. I've been looking for a replacement :)
Post a Comment